10 Delicious 4th of July Desserts to Celebrate Independence Day

The 4th of July is all about celebrating independence and what better way to do that than with delicious desserts? Whether you’re firing up the grill watching fireworks or enjoying a picnic these tasty treats can add a sweet touch to your holiday festivities. Get ready to indulge in some fun and festive recipes that will impress your friends and family while satisfying your sweet tooth!
Grilled Peach Sundaes
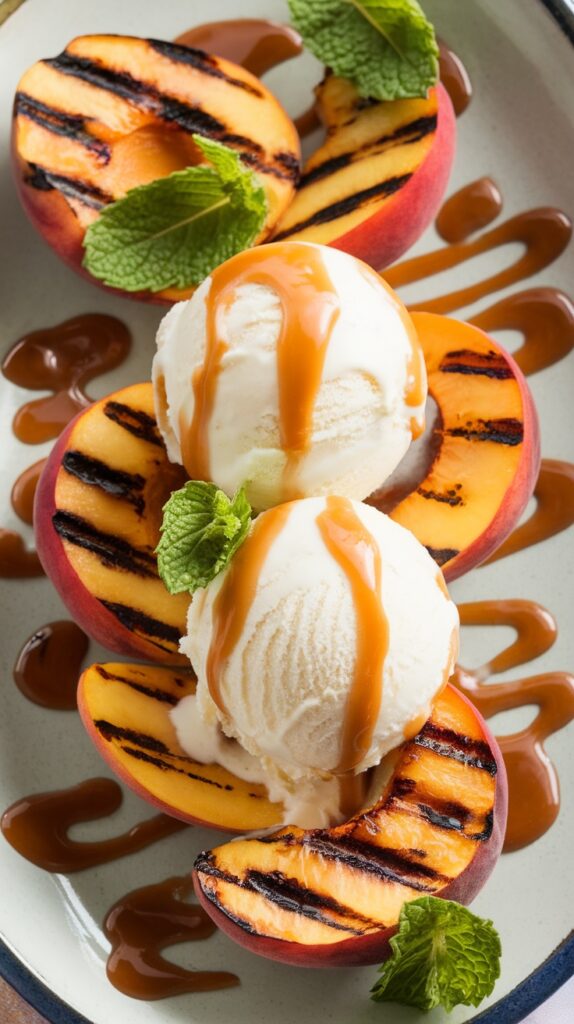
Grilled peach sundaes are a delightful way to celebrate summer flavors. The sweetness of juicy peaches enhanced by grilling brings out their natural sugars and adds a smoky depth that pairs beautifully with creamy vanilla ice cream. This treat is not only delicious but also simple to make making it a perfect addition to your 4th of July festivities.
With a few fresh ingredients and minimal prep you can create a dessert that feels special without spending hours in the kitchen. Top it off with a drizzle of caramel sauce and a sprig of mint to elevate the presentation. Your guests will love this easy yet impressive dessert!
Ingredients
- 4 ripe peaches halved and pitted
- 2 tablespoons olive oil
- 1 pint vanilla ice cream
- 1/4 cup caramel sauce
- Fresh mint leaves for garnish
Instructions
- Preheat your grill to medium heat.
- Brush the cut sides of the peach halves with olive oil.
- Place the peaches cut-side down on the grill and cook for about 4-5 minutes or until grill marks appear and the peaches are tender.
- Remove from the grill and let them cool slightly.
- To serve place a grilled peach half in a bowl add a scoop of vanilla ice cream on top and drizzle with caramel sauce. Garnish with fresh mint leaves.
Patriotic Berry Trifle
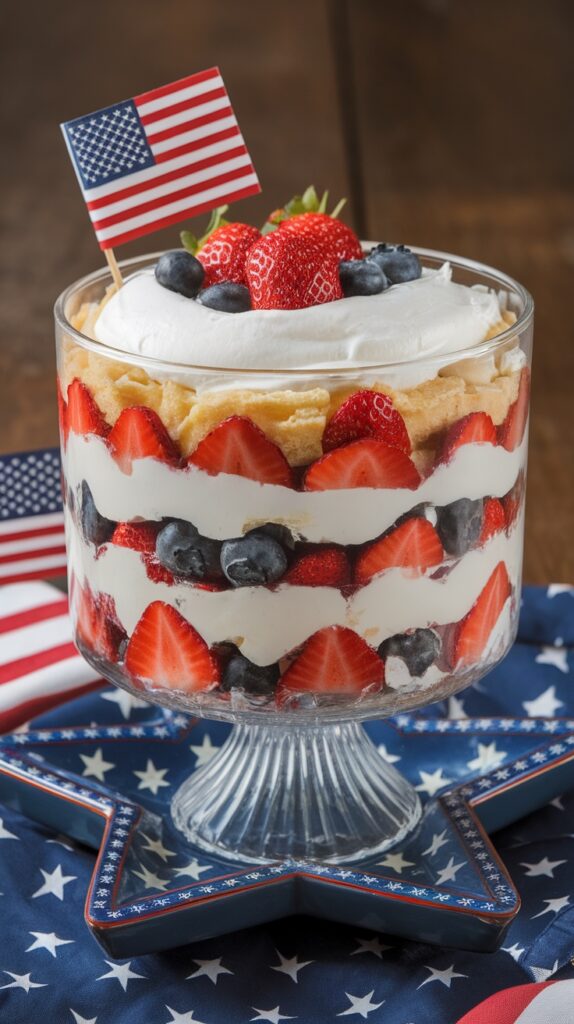
This Patriotic Berry Trifle is a delightful treat that captures the spirit of Independence Day with its vibrant layers of red strawberries blue blueberries and fluffy whipped cream. It’s a simple and fun dessert to whip up making it perfect for your 4th of July celebrations. The combination of fresh fruit and creamy layers creates a refreshing flavor that everyone will love.
Assembly is a breeze—just layer the ingredients in a trifle dish and you’ll have a stunning centerpiece for your dessert table. Whether you’re hosting a barbecue or attending a picnic this trifle is sure to impress!
Ingredients
- 2 cups strawberries sliced
- 2 cups blueberries
- 1 cup heavy whipping cream
- 1/2 cup granulated sugar
- 1 teaspoon vanilla extract
- 1 package of ladyfingers or pound cake
- Fresh mint leaves for garnish (optional)
Instructions
- Whip the Cream: In a mixing bowl combine heavy whipping cream sugar and vanilla extract. Whip until soft peaks form.
- Layer the Ingredients: In a trifle dish start with a layer of ladyfingers or pound cake at the bottom. Follow with a layer of whipped cream then add a layer of sliced strawberries and blueberries.
- Repeat Layers: Continue to layer until you reach the top of the dish finishing with a layer of whipped cream. You can top it off with additional strawberries and blueberries for a festive look.
- Chill: Refrigerate the trifle for at least an hour before serving to let the flavors meld together.
- Serve: Garnish with fresh mint leaves if desired and scoop out servings to enjoy!
Sparkling Firecracker Jello

If you’re looking for a festive dessert that’s both fun and delicious Sparkling Firecracker Jello is a perfect choice! This vibrant treat combines layers of red white and blue jello topped with fresh blueberries and a sprinkle of edible sparkles. It’s a refreshing and playful addition to your 4th of July celebration sure to delight guests of all ages.
The layers add a burst of flavor with fruity notes that are perfectly balanced. Plus it’s super easy to make so you won’t spend all day in the kitchen. Just whip up the jello layer it and let it chill. The result is a delightful colorful dessert that captures the spirit of the holiday!
Ingredients
- 1 box (3 oz) red gelatin (strawberry or cherry flavor)
- 1 box (3 oz) blue gelatin (blue raspberry or berry flavor)
- 1 box (3 oz) unflavored gelatin
- 2 cups boiling water
- 2 cups cold water
- 1 cup fresh blueberries
- Edible sparkler sticks for decoration
Instructions
- Prepare the Red Layer: In a bowl dissolve the red gelatin in 1 cup of boiling water. Stir until fully dissolved then mix in 1 cup of cold water. Pour into clear cups and refrigerate until set about 2 hours.
- Prepare the Blue Layer: Repeat the same process with the blue gelatin. Once the red layer is set carefully pour the blue gelatin on top of the red layer and refrigerate again until set about 2 hours.
- Make the White Layer: For the white layer dissolve the unflavored gelatin in 1 cup of boiling water then mix in 1 cup of cold water. Allow it to cool slightly and carefully pour it over the blue layer. Refrigerate until fully set about 2 hours.
- Assemble and Serve: Once all layers are set top each cup with fresh blueberries and insert an edible sparkler stick for a fun presentation. Enjoy your Sparkling Firecracker Jello!
Firework Fruit Skewers
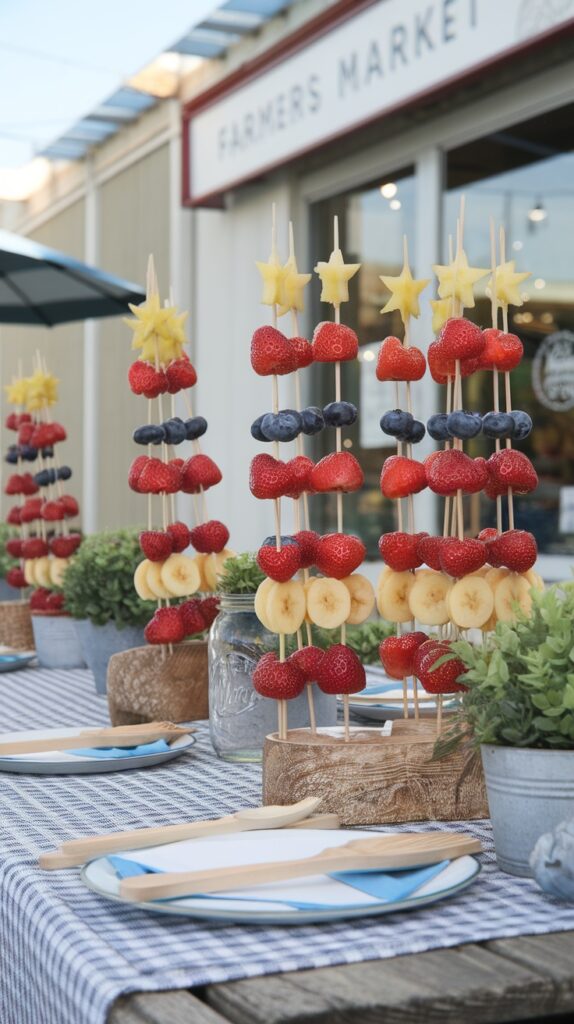
Firework Fruit Skewers are a fun and tasty way to celebrate the 4th of July! Bursting with fresh fruit these colorful skewers are not only visually appealing but also healthy and refreshing. The combination of juicy strawberries sweet bananas and tart blueberries creates a delightful flavor that everyone will enjoy. Plus they are super easy to make making them a perfect addition to any summer gathering.
Assembling these skewers is a great activity for kids and adults alike. You can get creative by cutting the fruit into fun shapes or simply layering them in a festive pattern. Whether you’re hosting a barbecue or attending a picnic these fruit skewers will add a pop of color to your dessert table and are guaranteed to please!
Ingredients
- 1 cup strawberries hulled
- 2 medium bananas sliced
- 1 cup blueberries
- 1 cup pineapple cut into star shapes
- Wooden skewers
- Mint leaves for garnish (optional)
Instructions
- Prepare the Fruit: Wash and cut the strawberries bananas and pineapple into desired sizes. Make star shapes from the pineapple using a small cookie cutter.
- Assemble the Skewers: Take a wooden skewer and start threading the fruit onto it. Start with a pineapple star followed by a strawberry a slice of banana and a blueberry. Repeat the pattern until the skewer is filled.
- Garnish: Once all the skewers are assembled you can place them upright in a container or arrange them on a platter. Add mint leaves for a touch of color.
- Serve: Enjoy these refreshing fruit skewers right away or chill in the fridge for a bit before serving!
Red White and Blue Cupcakes

Red White and Blue Cupcakes are a delightful treat that perfectly captures the spirit of the 4th of July. These festive cupcakes are light fluffy and bursting with flavor making them a hit at any summer celebration. The combination of red velvet vanilla and blue raspberry or blueberry frosting adds a fun twist to traditional cupcakes.
Not only are these cupcakes visually appealing but they’re also simple to make even for beginner bakers. The layers of color symbolize patriotism while delivering a sweet taste that everyone will enjoy. Let’s dive into the recipe!
Ingredients
- 1 1/2 cups all-purpose flour
- 1 cup granulated sugar
- 1 teaspoon baking powder
- 1/2 teaspoon baking soda
- 1/4 teaspoon salt
- 1/2 cup unsweetened cocoa powder
- 1 cup vegetable oil
- 1 cup buttermilk
- 2 large eggs
- 1 teaspoon vanilla extract
- Red food coloring
- Blue food coloring
- 1 cup butter softened
- 4 cups powdered sugar
- 2 tablespoons milk
- Sprinkles for decoration
Instructions
- Preheat your oven to 350°F (175°C) and line a cupcake pan with liners.
- In a large bowl mix together flour sugar baking powder baking soda salt and cocoa powder.
- In another bowl whisk together oil buttermilk eggs and vanilla extract until well combined.
- Gradually add the wet mixture to the dry ingredients stirring until just combined.
- Divide the batter into three bowls. Color one portion red using food coloring leave one white (vanilla) and color the last blue.
- Spoon the red batter into the bottom of each cupcake liner followed by a layer of vanilla and then the blue batter on top.
- Bake for 18-20 minutes or until a toothpick comes out clean from the center. Let cool completely.
- For the frosting beat the softened butter until creamy. Gradually add powdered sugar and milk until the desired consistency is reached. Separate into three bowls and color each batch red white and blue.
- Frost the cooled cupcakes with each colored frosting. Finish with sprinkles for a festive touch.
Cherry Pie with Flag Crust

Cherry pie is a classic dessert that bursts with sweet and tart flavors making it a perfect addition to your 4th of July celebrations. The tender flaky crust combined with the vibrant cherry filling offers a delightful treat that everyone can enjoy. Plus creating a flag design on top adds a festive touch that is both charming and patriotic.
This recipe is simple enough for bakers of all levels. With just a few ingredients you can whip up a delicious cherry pie that will leave your guests asking for seconds. The best part? You can prepare it ahead of time so you can focus on enjoying the holiday!
Ingredients
- 2 cups fresh or frozen cherries
- 3/4 cup granulated sugar
- 2 tablespoons cornstarch
- 1 tablespoon lemon juice
- 1 teaspoon vanilla extract
- 1/4 teaspoon almond extract (optional)
- 1 tablespoon butter cut into small pieces
- 1 package refrigerated pie crusts (2 crusts)
Instructions
- Preheat the oven to 425°F (220°C).
- In a large bowl combine cherries sugar cornstarch lemon juice and extracts. Stir until well mixed.
- Roll out one pie crust and place it in a 9-inch pie pan. Pour the cherry mixture into the crust and dot with butter.
- Roll out the second pie crust. Cut it into strips and arrange them in a flag pattern over the filling. Seal the edges by crimping with a fork.
- Bake for 30-35 minutes or until the crust is golden brown and the filling is bubbling. Let it cool before serving.
Stars and Stripes Ice Cream Cake

Stars and Stripes Ice Cream Cake is a fun and festive dessert that’s perfect for your 4th of July celebrations. This cake offers a delightful combination of flavors with layers of ice cream and cake that create a creamy sweet treat everyone will love. It’s simple to make and you can customize it with your favorite ice cream flavors and toppings.
The vibrant red white and blue layers not only look fantastic but also provide a refreshing taste that pairs wonderfully with summer festivities. Whether you’re hosting a barbecue or attending a picnic this cake is sure to be a crowd-pleaser!
Ingredients
- 1 box of cake mix (any flavor)
- 2 quarts of ice cream (vanilla strawberry and blue raspberry or any preferred flavors)
- 1 container of whipped topping
- Red white and blue sprinkles
- Optional: fresh fruit for decoration such as strawberries and blueberries
Instructions
- Bake the Cake: Prepare the cake according to package instructions. Allow it to cool completely before assembling.
- Layer the Ice Cream: In a springform pan layer one flavor of ice cream at the bottom and let it soften slightly to spread easily. Freeze for about 30 minutes.
- Add More Layers: Repeat the process with the other ice cream flavors allowing each layer to freeze before adding the next.
- Top It Off: Once all layers are stacked frost the cake with whipped topping and decorate with sprinkles and fresh fruit for a festive touch.
- Chill and Serve: Freeze the cake for a few hours until firm. Slice and enjoy this delightful treat at your holiday gathering!
Red Velvet Whoopie Pies

Red Velvet Whoopie Pies are a delightful twist on a classic dessert. These soft cake-like cookies have a subtle cocoa flavor and a striking red color making them perfect for festive celebrations like the 4th of July. They are filled with a creamy frosting that balances the sweetness of the cookie creating a treat that is both indulgent and fun.
Not only are these whoopie pies visually appealing but they are also simple to make. With just a few ingredients and easy steps you can whip up a batch that is sure to impress your friends and family. Whether you’re serving them at a barbecue or enjoying them at home these whoopie pies will add a festive touch to your dessert table.
Ingredients
- 2 cups all-purpose flour
- 1 tablespoon cocoa powder
- 1 teaspoon baking soda
- 1/2 teaspoon salt
- 1 cup granulated sugar
- 1 cup vegetable oil
- 2 large eggs
- 1 tablespoon red food coloring
- 1 teaspoon vanilla extract
- 1 cup buttermilk
- 1 cup unsalted butter softened
- 4 cups powdered sugar
- 1 teaspoon vanilla extract
Instructions
- Preheat the oven to 350°F (175°C) and line a baking sheet with parchment paper.
- In a bowl whisk together flour cocoa powder baking soda and salt. Set aside.
- In another large bowl beat the sugar and vegetable oil together until combined. Add eggs food coloring and vanilla extract mixing well.
- Alternate adding the dry ingredients and buttermilk to the wet mixture starting and ending with the dry ingredients. Mix until just combined.
- Drop spoonfuls of the batter onto the prepared baking sheet spacing them about 2 inches apart.
- Bake for 10-12 minutes or until a toothpick inserted into the center comes out clean. Let them cool completely on a wire rack.
- For the filling beat the softened butter with powdered sugar and vanilla until fluffy. Spread or pipe the filling onto the flat side of one cookie then top with another cookie to form a sandwich.
- Serve and enjoy your Red Velvet Whoopie Pies!
Chocolate Dipped Strawberry Sparklers

Chocolate dipped strawberry sparklers are a delightful treat that brings a festive flair to your 4th of July celebrations. These sweet and juicy strawberries coated in rich chocolate and drizzled with white chocolate offer a perfect balance of flavors that everyone will love. They’re quick to make and can be a fun project to do with friends or family making them ideal for summer gatherings.
Not only do these treats taste delicious but they also look festive with a pop of color making them a visually appealing dessert. They are simple to prepare and require minimal ingredients so you can whip them up in no time. Just grab some fresh strawberries and chocolate and you’re ready to celebrate!
Ingredients
- 1 pound fresh strawberries
- 8 ounces semi-sweet chocolate chopped
- 4 ounces white chocolate chopped
- Wooden skewers or lollipop sticks
- Sprinkles (optional)
Instructions
- Prepare the Strawberries: Wash and dry the strawberries thoroughly. Make sure they are completely dry to ensure the chocolate adheres well.
- Melting the Chocolate: In a microwave-safe bowl melt the semi-sweet chocolate in 30-second intervals stirring in between until smooth.
- Dip the Strawberries: Insert a wooden skewer into each strawberry and dip them into the melted chocolate. Allow any excess chocolate to drip off.
- Chill: Place the dipped strawberries on a baking sheet lined with parchment paper and refrigerate until the chocolate is set about 30 minutes.
- Decorate: Melt the white chocolate the same way as the semi-sweet chocolate. Drizzle over the set chocolate strawberries and add sprinkles if desired.
- Serve: Once the white chocolate has set your chocolate dipped strawberry sparklers are ready to serve!
Blueberry Lemonade Popsicles
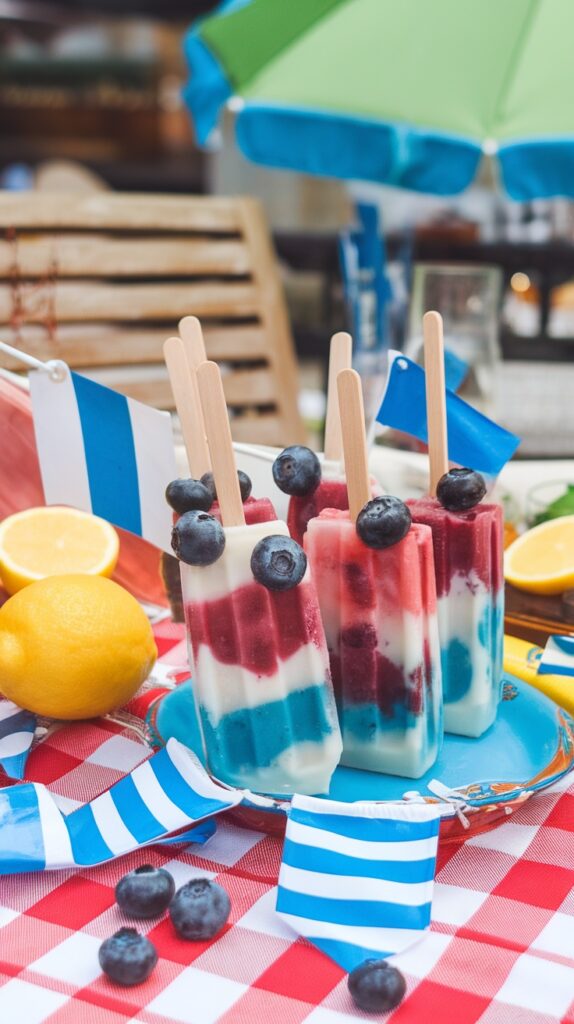
Blueberry Lemonade Popsicles are a refreshing treat that perfectly combines sweet and tart flavors making them a delightful choice for hot summer days especially around the 4th of July. These popsicles are not only easy to make but also a fun activity to involve the kids. With layers of tangy lemonade and juicy blueberries they are sure to impress family and friends.
The bright colors and fruity taste make these popsicles a festive addition to any summer gathering. Plus the recipe itself is straightforward requiring just a few ingredients and a little patience while they freeze. Enjoy a burst of flavor with every bite!
Ingredients
- 2 cups fresh blueberries
- 1 cup lemonade (store-bought or homemade)
- 1 cup coconut milk (or yogurt for a creamier texture)
- 1 tablespoon honey (optional for added sweetness)
- 1 teaspoon vanilla extract
Instructions
- Prepare the Blueberry Layer: In a blender puree the blueberries until smooth. If desired strain the mixture to remove skins for a smoother texture.
- Mix the Lemonade Layer: In a bowl combine lemonade and honey (if using). Stir until well mixed.
- Assemble the Popsicles: In popsicle molds start with a layer of blueberry puree followed by a layer of coconut milk and then a layer of the lemonade mixture. Repeat the layers until the molds are full.
- Add Sticks: Insert popsicle sticks and freeze for at least 4-6 hours or until completely solid.
- Serve: To remove the popsicles run warm water over the outside of the molds for a few seconds and gently pull out the popsicles. Enjoy your refreshing treats!