10 Creative Back to School Cookie Recipes Your Kids Will Love

As the school year kicks off it’s time to treat yourself and your kids to some delicious back-to-school cookies! These simple yet fun recipes are perfect for celebrating the start of a new academic adventure. Whether you’re looking for an easy bake to make after school or a sweet surprise in lunchboxes these cookies are sure to bring a little joy to your day.
Peanut Butter & Jelly Cookies
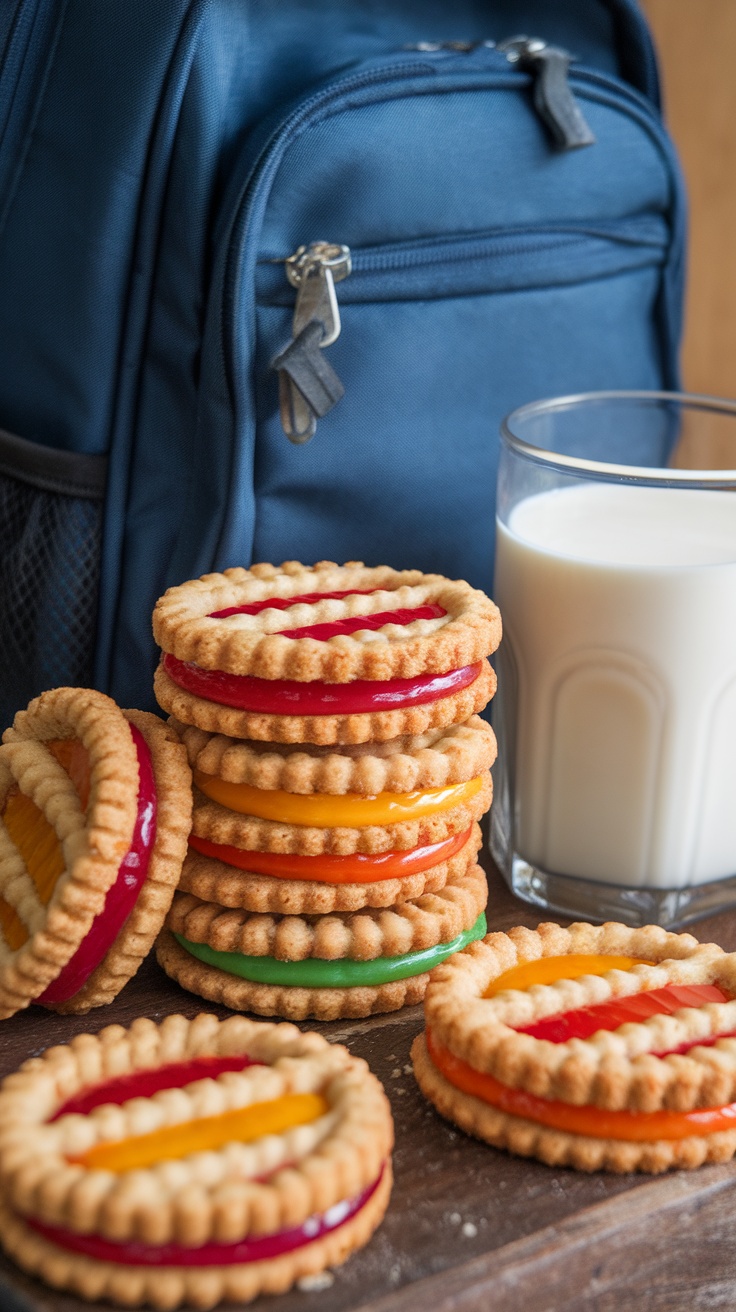
Peanut Butter & Jelly Cookies are a delightful twist on a classic childhood favorite. These cookies combine the nutty flavor of peanut butter with the sweet fruity taste of jelly all nestled between two soft buttery cookie layers. They offer a comforting nostalgic taste that everyone loves making them perfect for after-school snacks or lunchbox treats.
Not only are these cookies simple to make but they also bring a fun and creative flair to your baking routine. With just a few ingredients and easy steps you can whip up a batch that will have both kids and adults reaching for more.
Ingredients
- 1 cup creamy peanut butter
- 1/2 cup granulated sugar
- 1/2 cup brown sugar packed
- 1 large egg
- 1 teaspoon vanilla extract
- 1 teaspoon baking soda
- 1/4 teaspoon salt
- 1/2 cup jelly or jam (your choice of flavor)
Instructions
- Preheat the oven to 350°F (175°C). Line a baking sheet with parchment paper.
- In a large bowl combine the peanut butter granulated sugar brown sugar egg vanilla extract baking soda and salt. Mix until well combined and smooth.
- Using a tablespoon drop spoonfuls of dough onto the prepared baking sheet spacing them about 2 inches apart.
- Use a fork to create a crisscross pattern on the top of each cookie.
- Bake for 10-12 minutes or until the edges are golden. Remove from the oven and let cool for a few minutes.
- Once cooled slightly spread a small amount of jelly on the bottom of half of the cookies. Top with the remaining cookies to create sandwiches.
- Allow the cookies to cool completely before serving.
Oatmeal Raisin Energy Bites

Getting back into the school routine doesn’t have to mean sacrificing taste for nutrition. These oatmeal raisin energy bites are a delightful blend of chewy oats and sweet raisins making them a delicious option for kids and adults alike. They’re simple to prepare and perfect for an on-the-go snack or a quick pick-me-up during study sessions.
The combination of oats and raisins offers a satisfying texture and natural sweetness while the nut butter adds richness and protein. These energy bites are not only fun to make but they also store well ensuring that you have a healthy treat handy whenever cravings strike. Plus they can be customized with various mix-ins to suit your family’s preferences!
Ingredients
- 2 cups rolled oats
- 1 cup peanut butter (or any nut butter of choice)
- 1/2 cup honey or maple syrup
- 1/2 cup raisins
- 1/4 cup mini chocolate chips (optional)
- 1 teaspoon vanilla extract
- 1/2 teaspoon salt
- 1/2 teaspoon cinnamon
Instructions
- Combine Ingredients: In a large bowl mix together the rolled oats peanut butter honey (or maple syrup) raisins vanilla extract salt and cinnamon until well combined.
- Mix Well: If using fold in the mini chocolate chips for a little extra sweetness.
- Form Bites: Scoop out about a tablespoon of the mixture and roll it into a ball. Repeat with the remaining mixture.
- Chill: Place the energy bites on a baking sheet lined with parchment paper and refrigerate for at least 30 minutes to firm up.
- Store: Once set transfer them to an airtight container. They can be kept in the fridge for up to a week or you can freeze them for longer storage.
Chocolate Chip Surprise Cookies

Chocolate Chip Surprise Cookies are the ultimate treat to welcome back the school year. With a soft and chewy texture each bite reveals a delightful surprise that kids will love. These cookies are simple to make ensuring that even beginner bakers can whip them up in no time. You can customize the surprises inside adding a fun twist to the classic chocolate chip cookie!
These cookies not only taste delicious but also bring a touch of creativity to the kitchen. Whether you choose to hide a piece of chocolate a fruity gummy or a marshmallow the element of surprise keeps everyone guessing. Grab your apron and let’s get baking!
Ingredients
- 2 1/4 cups all-purpose flour
- 1 teaspoon baking soda
- 1/2 teaspoon salt
- 1 cup unsalted butter softened
- 3/4 cup granulated sugar
- 3/4 cup brown sugar packed
- 1 teaspoon vanilla extract
- 2 large eggs
- 2 cups semi-sweet chocolate chips
- 1 cup chocolate or candy surprises (like mini candies marshmallows or gummy bears)
Instructions
- Preheat your oven to 350°F (175°C) and line a baking sheet with parchment paper.
- In a bowl whisk together flour baking soda and salt. Set aside.
- In a large mixing bowl cream together the softened butter granulated sugar and brown sugar until light and fluffy. Beat in the eggs and vanilla extract.
- Gradually mix in the dry ingredients until just combined. Fold in the chocolate chips and any chosen surprises.
- Drop spoonfuls of dough onto the prepared baking sheet leaving enough space in between.
- Bake for 10-12 minutes or until the edges are lightly golden. Let cool on the baking sheet for a few minutes before transferring to a wire rack to cool completely.
Funfetti Cookies for Celebrating New Beginnings

Funfetti cookies are a joyful way to mark new beginnings especially as the school year kicks off. These vibrant treats are soft chewy and bursting with colorful sprinkles that bring a smile to every face. They’re not just visually appealing; the sweet vanilla flavor pairs beautifully with the slight crunch of the sprinkles making each bite delightful.
This recipe is simple enough for bakers of all skill levels so even kids can join in the fun. With just a handful of ingredients and minimal prep time you’ll have a batch of these cheerful cookies ready to celebrate any occasion or brighten up a lunchbox.
Ingredients
- 1 cup unsalted butter softened
- 1 cup granulated sugar
- 1/2 cup brown sugar packed
- 2 large eggs
- 1 teaspoon vanilla extract
- 3 cups all-purpose flour
- 1 teaspoon baking soda
- 1/2 teaspoon salt
- 1 cup rainbow sprinkles
Instructions
- Preheat the oven to 350°F (175°C) and line baking sheets with parchment paper.
- In a large bowl cream together the softened butter granulated sugar and brown sugar until light and fluffy. Beat in the eggs one at a time then stir in the vanilla extract.
- In another bowl whisk together the flour baking soda and salt. Gradually add the dry ingredients to the wet ingredients mixing until just combined.
- Gently fold in the rainbow sprinkles until evenly distributed throughout the dough.
- Drop rounded tablespoons of dough onto the prepared baking sheets spacing them about 2 inches apart. Bake for 10-12 minutes or until the edges are lightly golden.
- Remove from the oven and let cool on the baking sheets for a few minutes before transferring to wire racks to cool completely.
Sugar Cookies with Fun Icing Designs

These sugar cookies are a delightful treat that combines a soft buttery texture with vibrant and playful icing designs. Perfect for back-to-school celebrations or just a fun baking activity they offer a simple yet creative way to express your artistic side in the kitchen. The sweet flavor pairs perfectly with the colorful icing making them a hit with kids and adults alike.
This recipe is easy to follow making it a great choice for bakers of all skill levels. Whether you’re whipping them up for a school event or just enjoying a cozy baking day at home these cookies will bring smiles all around.
Ingredients
- 2 3/4 cups all-purpose flour
- 1 teaspoon baking soda
- 1/2 teaspoon baking powder
- 1 cup unsalted butter softened
- 1 1/2 cups white sugar
- 1 egg
- 1 teaspoon vanilla extract
- 1/2 teaspoon almond extract
- 1/2 teaspoon salt
- 3 cups powdered sugar
- 3 tablespoons milk
- 1 teaspoon vanilla extract (for icing)
- Food coloring (various colors)
Instructions
- Prepare the Cookie Dough: Preheat your oven to 375°F (190°C). In a bowl stir together the flour baking soda and baking powder. Set aside.
- Mix Wet Ingredients: In a large bowl cream together the butter white sugar and egg until smooth. Mix in the vanilla and almond extracts.
- Combine Ingredients: Gradually add the dry ingredients to the wet mixture mixing until fully combined.
- Shape the Cookies: Roll dough into balls and place them on ungreased cookie sheets. Flatten slightly with a glass.
- Bake: Bake for about 8 to 10 minutes in the preheated oven or until golden. Let cool on wire racks.
- Make the Icing: In a medium bowl mix powdered sugar milk and vanilla extract until smooth. Divide into smaller bowls and add food coloring to each.
- Decorate: Once cookies are cool use piping bags or a simple knife to ice your cookies with fun designs. Get creative with colors and patterns!
Apple Cinnamon Cookies

These Apple Cinnamon Cookies are a delightful combination of sweet apples and warm spices. They offer a comforting taste that’s perfect for back-to-school snacks or an after-school treat. With a simple recipe that’s easy to follow even the kids can lend a hand in the kitchen!
The cookies have a soft chewy texture and are infused with the cozy flavors of cinnamon and apple making them a great addition to lunchboxes. Plus they make your home smell amazing while baking!
Ingredients
- 1 cup unsalted butter softened
- 1 cup brown sugar packed
- 1/2 cup granulated sugar
- 2 large eggs
- 1 teaspoon vanilla extract
- 3 cups all-purpose flour
- 1 teaspoon baking soda
- 1 teaspoon ground cinnamon
- 1/2 teaspoon salt
- 1 cup grated apples (about 2 medium apples)
- 1/2 cup chopped walnuts or pecans (optional)
Instructions
- Preheat your oven to 350°F (175°C) and line a baking sheet with parchment paper.
- In a large bowl cream together the softened butter brown sugar and granulated sugar until light and fluffy. Add the eggs one at a time mixing well after each addition then stir in the vanilla extract.
- In a separate bowl whisk together the flour baking soda cinnamon and salt. Gradually add this dry mixture to the wet ingredients mixing until just combined.
- Fold in the grated apples and nuts if using ensuring they are evenly distributed throughout the dough.
- Using a spoon or cookie scoop drop rounded tablespoons of dough onto the prepared baking sheet spacing them about 2 inches apart.
- Bake for 10-12 minutes or until the edges are golden and the centers are set. Allow the cookies to cool on the sheet for a few minutes before transferring them to a wire rack to cool completely.
Snickerdoodle School Spirit Cookies

Snickerdoodle School Spirit Cookies are a delightful twist on the classic snickerdoodle. Soft chewy and coated in a mixture of cinnamon and sugar these cookies are perfect for any school event or celebration. The addition of colorful sprinkles adds a festive touch making them a hit among students and parents alike.
This recipe is simple to make allowing you to whip up a batch in no time. With just a few basic ingredients you can create cookies that not only taste delicious but also show off your school spirit!
Ingredients
- 1 cup unsalted butter softened
- 1 1/2 cups granulated sugar
- 2 large eggs
- 2 3/4 cups all-purpose flour
- 2 teaspoons cream of tartar
- 1 teaspoon baking soda
- 1/2 teaspoon salt
- 2 tablespoons cinnamon
- 1/4 cup sprinkles
Instructions
- Preheat the oven to 350°F (175°C). Line a baking sheet with parchment paper.
- In a large bowl cream together the softened butter and granulated sugar until light and fluffy. Add the eggs one at a time mixing well after each addition.
- In another bowl whisk together the flour cream of tartar baking soda and salt. Gradually add this dry mixture to the wet mixture mixing until just combined.
- In a small bowl combine the cinnamon and sprinkles. Roll the dough into balls and then coat each ball in the cinnamon-sprinkle mixture.
- Place the coated dough balls on the prepared baking sheet spacing them about 2 inches apart. Flatten each ball slightly with the bottom of a glass.
- Bake for 10-12 minutes or until the edges are lightly golden. Remove from the oven and let the cookies cool on the baking sheet for a few minutes before transferring them to a wire rack to cool completely.
Chocolate Mint Cookie Sandwiches

Chocolate mint cookie sandwiches are a delightful treat that perfectly combines the rich flavor of chocolate with a refreshing minty twist. These cookies are not only fun to make but are also sure to please anyone looking for a sweet snack. With a soft and chewy texture each bite is a burst of flavor that kids and adults alike will enjoy.
Making these cookies is a simple process making them perfect for an afternoon baking session or for preparing a special snack for school lunches. With just a few ingredients you can whip up these sandwich cookies in no time!
Ingredients
- 1 cup unsweetened cocoa powder
- 1 cup granulated sugar
- 1/2 cup unsalted butter softened
- 2 large eggs
- 1 teaspoon vanilla extract
- 1 1/2 cups all-purpose flour
- 1/2 teaspoon baking powder
- 1/4 teaspoon salt
- 1 cup powdered sugar
- 1/4 cup heavy cream
- 1 teaspoon peppermint extract
- Green food coloring (optional)
Instructions
- Preheat the Oven: Start by preheating your oven to 350°F (175°C). Line a baking sheet with parchment paper.
- Make the Cookie Dough: In a large bowl cream together the softened butter and granulated sugar until smooth. Beat in the eggs one at a time then mix in the vanilla. Combine cocoa powder flour baking powder and salt in another bowl then gradually add to the butter mixture.
- Shape the Cookies: Drop tablespoon-sized amounts of dough onto the prepared baking sheet leaving space between them. Flatten each ball slightly with the back of a spoon.
- Bake: Bake in the preheated oven for about 10-12 minutes or until the edges are firm. Let them cool on the baking sheet for a couple of minutes before transferring to a wire rack.
- Prepare the Filling: In a bowl whisk together the powdered sugar heavy cream peppermint extract and a few drops of green food coloring until smooth. Adjust the color to your liking.
- Assemble the Sandwiches: Once the cookies have cooled completely spread a generous amount of the mint filling on the bottom of one cookie and top it with another creating a sandwich. Enjoy your tasty treats!
Caramel Stuffed Shortbread Cookies

Caramel Stuffed Shortbread Cookies are a delightful treat that blend the buttery richness of shortbread with the sweet gooey goodness of caramel. Each bite offers a satisfying crunch followed by a melt-in-your-mouth sensation making them a perfect snack for school lunches or after-school treats.
This recipe is simple enough for bakers of any level. With just a few basic ingredients you can whip up these cookies in no time. They are sure to be a hit with kids and adults alike adding a touch of sweetness to your day!
Ingredients
- 1 cup unsalted butter softened
- 1/2 cup granulated sugar
- 2 cups all-purpose flour
- 1/4 cup cornstarch
- 1/4 teaspoon salt
- 1 teaspoon vanilla extract
- 1 cup caramel sauce
Instructions
- Preheat the oven to 350°F (175°C). Line a baking sheet with parchment paper.
- In a large bowl cream together the softened butter and granulated sugar until light and fluffy. Add the vanilla extract and mix well.
- In another bowl whisk together the flour cornstarch and salt. Gradually add the dry ingredients to the butter mixture mixing until combined.
- Roll the dough into small balls and place them on the prepared baking sheet. Flatten each ball slightly with your palm.
- Use a thumb or small spoon to create an indentation in the center of each cookie. Fill the indentation with caramel sauce.
- Bake for 12-15 minutes or until the edges are lightly golden. Allow the cookies to cool on the baking sheet for a few minutes before transferring them to a wire rack to cool completely.
Gluten-Free Chocolate Chip Cookies

These gluten-free chocolate chip cookies are not just a treat; they’re a delightful way to kick off the school year! With a rich buttery flavor and plenty of gooey chocolate chunks they deliver that classic cookie experience without the gluten. Plus they’re super easy to whip up making them a perfect after-school snack or a lunchbox surprise.
Whether you’re baking for kids or just indulging in some self-care these cookies promise a soft and chewy texture that everyone will love. And the best part? You can enjoy them without worrying about gluten sensitivities. Let’s dive into the recipe!
Ingredients
- 1 cup almond flour
- 1/2 cup coconut flour
- 1/2 teaspoon baking soda
- 1/4 teaspoon salt
- 1/2 cup unsalted butter softened
- 1/2 cup brown sugar packed
- 1/4 cup granulated sugar
- 1 large egg
- 1 teaspoon vanilla extract
- 1 cup chocolate chips
Instructions
- Preheat the Oven: Start by preheating your oven to 350°F (175°C) and lining a baking sheet with parchment paper.
- Mix the Dry Ingredients: In a bowl whisk together the almond flour coconut flour baking soda and salt until well combined.
- Combine the Wet Ingredients: In a separate bowl cream together the softened butter brown sugar and granulated sugar until fluffy. Beat in the egg and vanilla extract until smooth.
- Combine Mixtures: Gradually add the dry ingredients to the wet mixture stirring until everything is well incorporated. Fold in the chocolate chips.
- Shape the Cookies: Using a tablespoon scoop out dough and roll it into balls. Place them on the prepared baking sheet leaving space for spreading.
- Bake: Bake for 10-12 minutes or until the edges are golden brown. Let them cool on the baking sheet for a few minutes before transferring to a wire rack to cool completely.